
TL;DR:
- Proper planning, site assessment, and compliance checks are essential to avoid costly signage installation errors.
- Using the correct tools, fixings, and weatherproofing measures ensures safety and longevity of outdoor signs.
- Ongoing maintenance and thorough verification post-installation are vital for lasting signage performance.
Poorly planned signage installation costs UK businesses more than most owners realise. Misaligned signs, incorrect fixings, planning permission oversights, and non-compliant placements can all lead to forced removal, financial penalties, or project delays that disrupt trading. The good news is that every one of these problems is preventable. This guide gives you a clear, practical, step-by-step process for signage installation, built specifically for retail, construction, and corporate environments in the UK. Follow it, and you will protect your investment, meet your legal obligations, and achieve the professional brand presence your business deserves.
Table of Contents
- Key preparations before installing signage
- Tools and materials: what you’ll need
- Step by step: the signage installation process
- Troubleshooting and common mistakes
- Verifying success and ongoing maintenance
- Expert perspective: why success starts before day one
- Professional signage, installed right the first time
- Frequently asked questions
Key Takeaways
| Point | Details |
|---|---|
| Prioritise compliance early | Check regulations and permissions before investing in signage for a hassle-free project. |
| Prepare the right tools | Gather all materials and safety gear in advance for a seamless and safe installation. |
| Follow methodical steps | Carefully follow each installation stage to avoid costly mistakes and ensure a professional finish. |
| Don’t skip verification | Always inspect and document your install, then schedule ongoing maintenance for best performance. |
Key preparations before installing signage
With the need for a systematic approach established, it is essential to begin with the right foundations before any installation work starts.
Most installation problems begin long before anyone picks up a drill. Skipping the preparation phase is the single biggest cause of delays, wasted spend, and compliance failures. Preparation is not about slowing things down; it is about making sure every decision you take on installation day is already the right one.
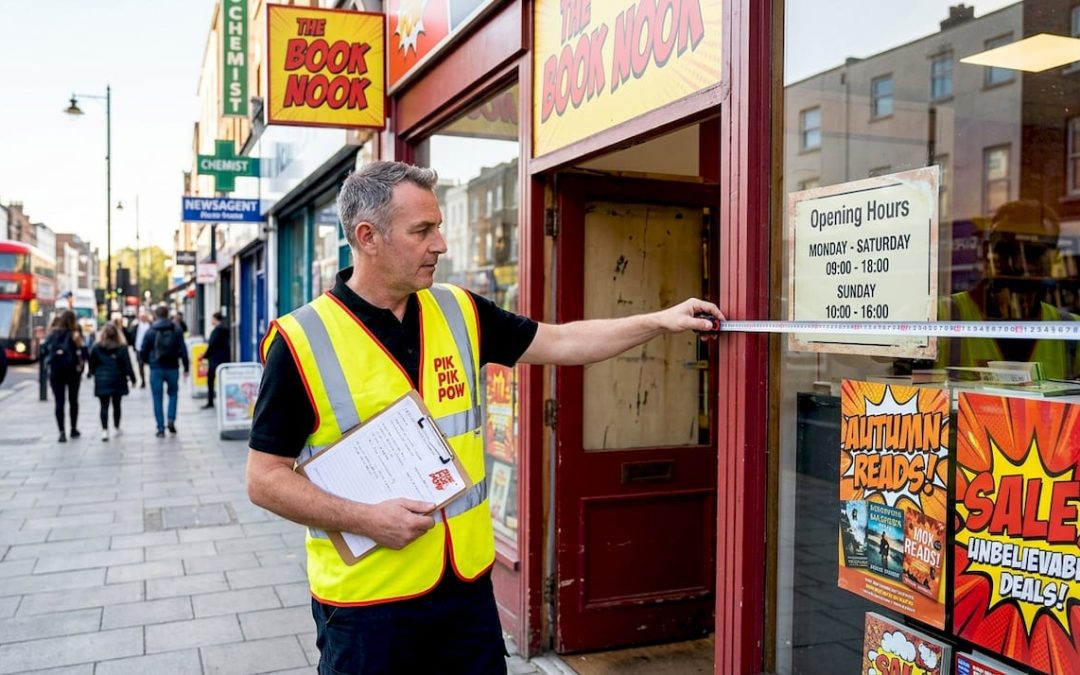
Site assessment is your starting point. Walk the intended location and evaluate visibility from key pedestrian and vehicle viewpoints. Check the structural integrity of the wall or surface. A rendered exterior wall behaves very differently from a brick or steel-framed surface, and your fixings must match accordingly. Consider how natural and artificial lighting will interact with the sign throughout the day, since a sign that reads clearly at noon can become almost invisible at dusk without the right finish or illumination.
Regulatory compliance is non-negotiable. Many outdoor signs in the UK fall under Advertisement Consent regulations, governed by the Town and Country Planning (Control of Advertisements) (England) Regulations 2007. Listed buildings and conservation areas carry additional restrictions. Your safety and compliance guide is a useful starting reference, and for detailed statutory obligations, reviewing UK signage regulations will confirm exactly what applies to your site. Consulting sign-code resources early is recognised best practice, because compliance affects not only installation but long-term maintenance planning too.
Here is a pre-installation checklist to work through before ordering or booking anything:
- Confirm the precise location, dimensions, and orientation of each sign
- Check whether Advertisement Consent or planning permission is required
- Identify any listed building or conservation area restrictions
- Assess wall construction material and load-bearing capacity
- Locate underground or concealed services near fixing points
- Confirm access requirements: scaffolding, cherry picker, or ladder
- Identify any health and safety risks specific to the site
- Prepare a full tool and materials list before the installation date
| Preparation task | Who is responsible | Typical timescale |
|---|---|---|
| Site structural assessment | Installer or surveyor | 1 to 2 weeks before install |
| Planning/consent application | Business owner or agent | 4 to 8 weeks before install |
| Tool and materials sourcing | Installer | 1 week before install |
| Access equipment booking | Site manager | 1 to 2 weeks before install |
| Safety risk assessment | Installer or H&S advisor | 1 week before install |
Pro Tip: Take dated photographs of the installation area before any work begins. These serve as a reference if alignment or compliance questions arise later, and they form part of your project documentation.
Tools and materials: what you’ll need
Once the groundwork and regulatory checks are complete, it is time to gather the tools and materials essential for a smooth installation.
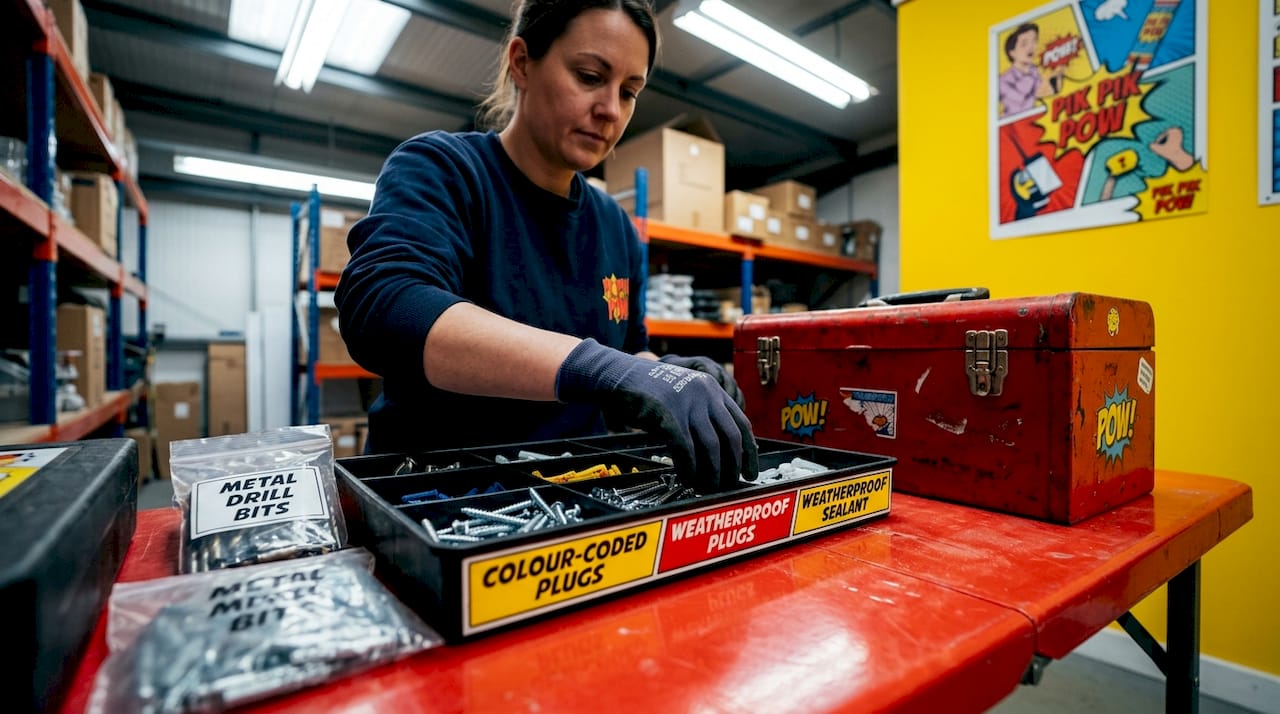
Arriving on site without the correct tools is a surprisingly common mistake, and it is entirely avoidable. A rushed trip back to the supplier adds time and cost to every project. Building a comprehensive kit list matched to your specific sign type and wall substrate will keep the job moving efficiently and safely.
Core installation tools you will need include:
- Cordless drill and a range of masonry, wood, and metal drill bits
- Spirit level (both short and long versions for larger signs)
- Tape measure and chalk line or laser level for accurate marking
- Fixing screws, rawl plugs, or specialist fixings suited to the wall type
- Appropriate adhesive if bonding to smooth or sensitive surfaces
- Cable detector or multi-scanner to check for hidden services before drilling
- Torque wrench for mechanical fixings on heavier sign panels
- Silicone sealant for weatherproofing around outdoor fixing points
- Ladders or access equipment appropriate to working height
Matching fixings to your substrate matters more than most business owners realise. Stainless steel fixings are essential for outdoor signs to prevent rust staining on the face of the sign or the building. Cavity walls require specialist cavity fixings rather than standard rawl plugs. For glazing or tiled surfaces, adhesive systems or through-bolt solutions may be preferable to drilling. Poor signage material choices at the installation stage can accelerate deterioration of an otherwise high-quality sign.
Reviewing relevant sign-code guidance is important here too, since installation and maintenance planning must always work around code constraints, and the wrong fixing method can create ongoing compliance or safety issues.
Safety equipment is mandatory, not optional. For construction sites and elevated installations:
- Hard hat and high-visibility vest where required
- Safety goggles when drilling overhead or into masonry
- Protective gloves when handling sharp-edged sign panels
- Non-slip footwear on any elevated platform
- Harness if working at significant height
Digital signage requires additional consideration. You will need confirmed access to a suitable power supply, conduit or trunking for cable management, and a qualified electrician if any new electrical connection is required.
| Sign type | Key fixings | Special materials needed |
|---|---|---|
| Flat panel fascia sign | Stainless steel screws, rawl plugs | Silicone sealant for outdoor use |
| Built-up letters | Stud fixings or adhesive pads | Cable management for illuminated versions |
| Freestanding sign | Ground anchor bolts or base plate | Concrete or resin for post fixing |
| Digital display | Bracket fixings, cable conduit | Power access, waterproof enclosure |
| Window graphics | Application squeegee, cleaning solution | Surface primer for long-term adhesion |
Pro Tip: Label all fixings, drill bits, and accessories in clearly marked bags before leaving for site. Searching through loose hardware on a working day wastes time and increases the chance of using the wrong component.
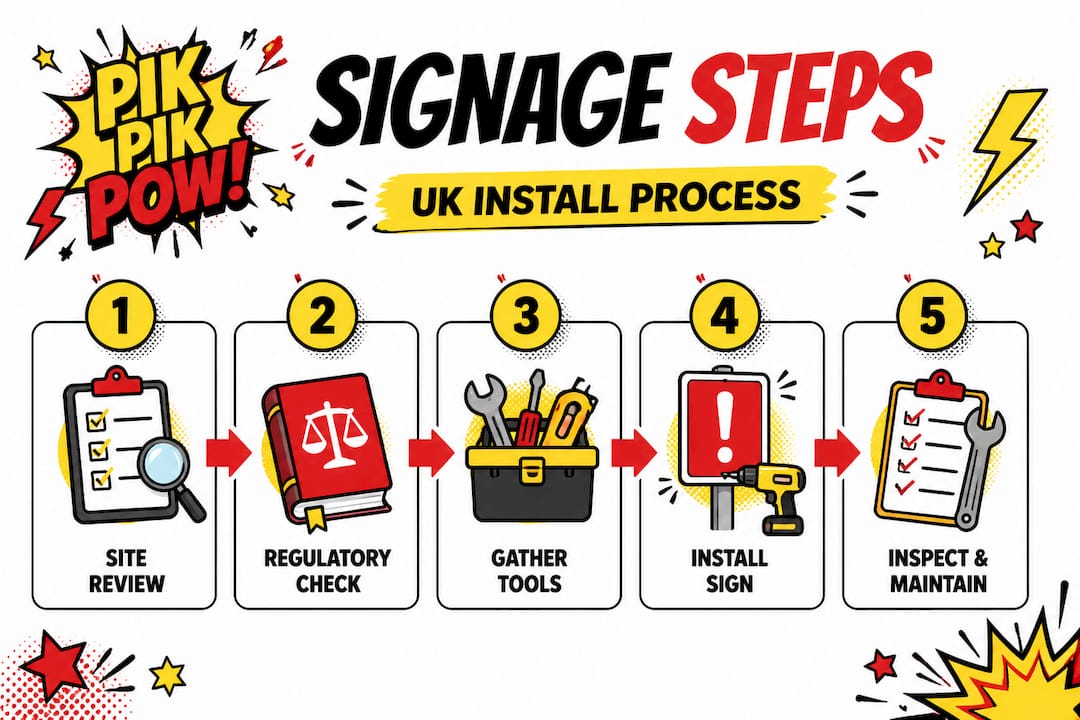
Step by step: the signage installation process
With everything ready at hand, following a precise method is essential to deliver both safety and professional brand presence.
A structured sequence prevents errors from compounding. Each step should be completed and verified before moving to the next.
- Mark out the fixing positions precisely using your measurements, spirit level, and chalk line or laser. Double-check alignment both horizontally and vertically before marking any surface.
- Scan the wall with a cable detector across all intended fixing points. Never drill without doing this, even if you believe the area is clear.
- Drill pilot holes at marked positions, matching drill bit size to the rawl plug or fixing specification. For masonry, use a hammer drill setting.
- Insert fixings or rawl plugs and test that each one seats securely before attaching the sign.
- Mount the sign panel with a second person assisting for any panel over one metre wide or significantly heavy. Check alignment once more before fully tightening fixings.
- Apply silicone sealant around all fixing points on outdoor signs to prevent water ingress behind the panel.
- For digital signage, connect to the power supply, manage cabling neatly through conduit, and power on for a full functional test before sign-off.
- Carry out a final compliance and safety inspection, verifying that the installation matches the approved design, all fixings are tight, and no sharp edges or protrusions create a hazard.
As sign-code best practices reinforce, compliance should be embedded in every installation phase, not treated as a final box to tick.
“Treat every stage of installation as an opportunity to verify compliance, not a task to rush through. A sign installed correctly the first time is a sign that earns its keep.”
Reviewing signage system best practices and referencing established sign installation processes from comparable projects can also guide your sequencing decisions.
| Factor | Wall-mounted signs | Freestanding signs |
|---|---|---|
| Structural check | Wall load capacity | Ground bearing capacity |
| Access needed | Ladder or platform | Ground-level, less risk |
| Weather sealing | Fixing points and panel edges | Base and post connections |
| Wind loading | Requires bracket strength check | Requires post depth calculation |
| Compliance check | Height, illumination, projection | Height, position, visibility splay |
Troubleshooting and common mistakes
Even with the right method, awareness of common pitfalls keeps your project trouble-free and your investment protected.
Understanding where installations typically go wrong saves both time and money. These are the errors we see most frequently in UK business signage projects.
Misaligned signs are almost always caused by skipping or rushing the layout stage. Even a small error in marking transfers directly to the finished installation. Always use a laser level for any sign wider than 600mm, and always check alignment with the sign temporarily held in position before any drilling begins.
Incorrect fasteners for the substrate cause signs to pull away from walls, sometimes weeks or months after installation. Plasterboard, for example, requires toggle bolts or specialist plasterboard fixings rather than standard rawl plugs. Outdoor environments demand stainless steel or marine-grade fixings to resist corrosion. Using the cheapest available fixing is a false economy.
Neglecting weatherproofing on outdoor signage is another recurring issue. Gaps around fixing points allow water to track behind the panel, causing the sign face to bow, the substrate to degrade, or water to penetrate the building fabric. Every external fixing point should receive a bead of UV-stable silicone sealant on completion.
Forgetting post-install compliance sign-off leaves your business exposed. If the sign was installed under Advertisement Consent, you may be required to notify the local planning authority on completion. Even where no formal notification is required, maintaining a record of installation is sound practice for future inspections or disputes.
Overlooking ongoing maintenance shortens sign life considerably. Reviewing safer signage practices and consulting sign-code guidance early in planning reduces maintenance headaches and non-compliance risks later.
Pro Tip: Schedule a formal post-installation inspection at three months and again at twelve months. Catching minor issues such as a loose fixing or a failing sealant joint early costs far less than a full remediation job down the line.
Verifying success and ongoing maintenance
With the signage now in place and any hiccups addressed, attention must turn to verification and ensuring lasting results for your investment.
Installation does not end when the last fixing is tightened. Proper verification and a structured maintenance plan are what separate a sign that lasts five years from one that lasts fifteen.
Carry out a structured finishing inspection covering alignment, fixing security, sealant application, panel face condition, and illumination function where applicable.
Document the installation with photographs from multiple angles, a record of fixings and materials used, and any reference to consent approvals. Store these with your property or lease records.
Register the sign for any manufacturer warranty if the product carries one, and retain receipts for all materials.
Set a maintenance calendar with scheduled tasks:
- Monthly: visual check for damage, graffiti, or loose components
- Quarterly: clean sign face with appropriate cleaning solution for the substrate
- Annually: full inspection of fixings, sealant integrity, and electrical components for illuminated signs
- As needed: prompt repair of any visible damage to maintain safety and brand presentation
Ignoring maintenance is not merely an aesthetic concern. Non-compliant or structurally unsafe signage can attract enforcement action from local authorities, resulting in fines or a requirement for forced removal at the business owner’s cost. As sign-code best practices confirm, maintenance plans should be considered at the compliance planning stage, not retrofitted after problems appear.
Investing in sign longevity strategies from the outset means your signage continues to perform as a brand asset rather than becoming a liability.
Expert perspective: why success starts before day one
Most installation guides focus on what happens on the day. Drill here, fix this, seal that. What they rarely address is the strategic mindset that separates businesses that get signage right from those that keep revisiting the same problems.
In our experience, the majority of installation failures are rooted not in poor craftsmanship on the day but in inadequate preparation in the weeks before. Businesses that rush to order signage before completing a site assessment or regulatory check routinely face one of three outcomes: the sign cannot be legally displayed, the fixing method is wrong for the substrate, or the final result does not match the design intent because the site constraints were not factored in early enough.
The most effective planning approach is to front-load your workflow. Understand your local code requirements first. Document every relevant site variable, from wall construction to access constraints to neighbouring structures that might affect visibility or consent. Build maintenance into your thinking before you even choose a sign type, because a product that looks impressive but cannot be serviced safely will cost you more over time than a simpler, well-considered alternative.
International best practice is clear that compliance is integral to installation planning, not something you deal with at the end. Businesses that follow this approach consistently report fewer delays, lower total project costs, and signage that delivers genuine return on investment over many years.
The hidden value in any signage project is in the planning. A well-prepared installation takes less time, generates fewer problems, and produces a result that truly serves your brand. Consider building your brand with compliant signage as a long-term business asset, not a one-off task.
Professional signage, installed right the first time
If this guide has demonstrated anything, it is that expert signage installation requires as much attention to planning and compliance as it does to the physical act of putting a sign on a wall. At Pik Pik POW!, we manage the entire process for you, from design and material selection through to full installation and compliance verification.

Our team works across UK retail, construction, and corporate sectors, delivering signage that meets regulatory requirements and performs as a long-term brand asset. Whether you need architectural signage for a commercial development or a complete branded environment for a retail space, our signage systems cover every requirement. Explore our architectural signage solutions to see the full range of options available, or get in touch to book a consultation with our team. We are here to make the process straightforward and the results outstanding.
Frequently asked questions
Who is responsible for sign installation compliance in the UK?
Business owners are ultimately responsible for ensuring all installed signage complies with UK regulations, including safety and planning requirements, regardless of who carries out the physical installation.
How do I check if I need planning permission for my sign?
Contact your local planning authority before installing any new sign, as consent requirements vary based on sign type, size, location, and whether the building is listed or within a conservation area.
What is the best way to maintain outdoor signs?
Regular cleaning with a substrate-appropriate solution, combined with quarterly visual inspections and prompt repair of any fixing or sealant failures, will maximise both the lifespan and safety of outdoor signage.
Can I install digital signage using the same steps as traditional signage?
Digital signage requires additional installation steps, including safe access to an appropriate electrical supply, proper cable management, and a full power-on functional test before the installation can be considered complete.
Recommended
- Property signage installation guide for UK businesses
- The ultimate shopfront signage checklist for UK businesses
- How to Design Signage for UK Retail Chains Effectively
- News and Updates: Get the Latest Updates and Information – Pik Pik Pow
- Master the property survey workflow in the UK: step-by-step guide