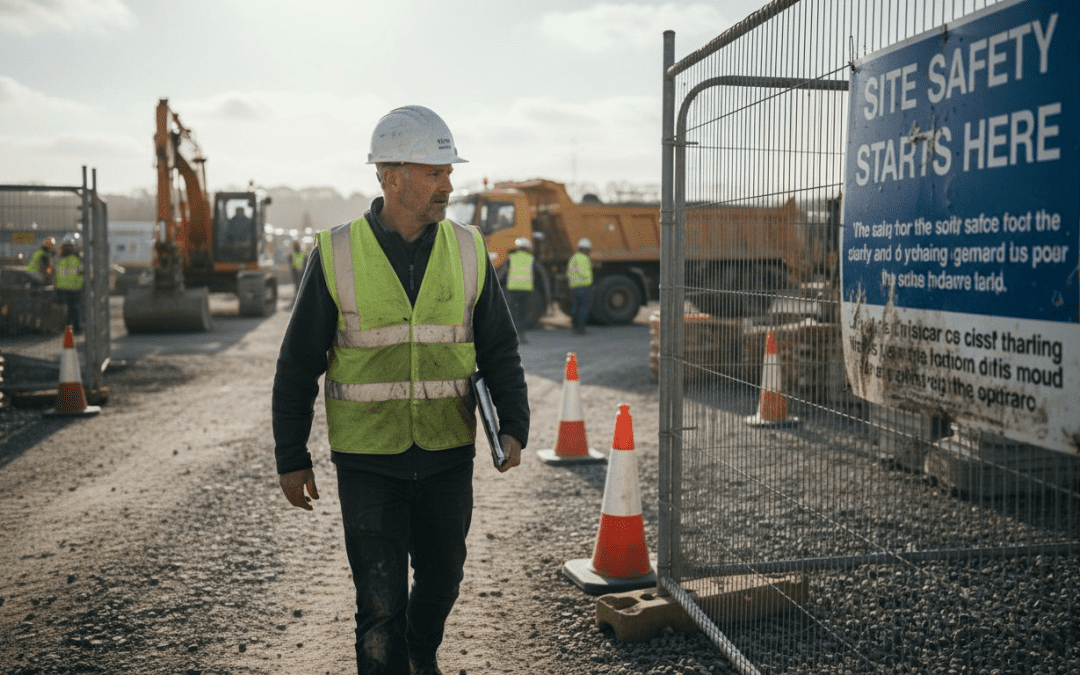
Every construction project manager knows that clear signage is more than ticking a box—it is a frontline safeguard on site and a reflection of your organisation’s standards. With strict British regulations such as the Health and Safety (Safety Signs and Signals) Regulations 1996 and British Standard BS EN ISO 7010 demanding precise compliance, getting signage right means safer, more cohesive sites and a stronger brand presence. This guide provides practical steps to assess requirements, support effective communication, and deliver signage that stands up to scrutiny at every phase.
Table of Contents
- Step 1: Assess Site Requirements And Branding
- Step 2: Plan Sign Types And Strategic Locations
- Step 3: Design Impactful And Compliant Signage
- Step 4: Review, Approve And Prepare For Installation
Quick Summary
| Key Point | Explanation |
|---|---|
| 1. Assess site requirements first | Evaluate physical space, regulations, and branding before designing signs to ensure effective placement and compliance. |
| 2. Plan sign types strategically | Identify essential sign categories and their locations based on risk assessment to enhance safety and communication. |
| 3. Design for clarity and compliance | Use bold typography, appropriate colours, and simple messages to ensure signage is legible and meets legal standards. |
| 4. Conduct a thorough review before installation | Involve site team in checking compliance and visibility to avoid costly mistakes and improve safety outcomes. |
| 5. Prepare installation logistics methodically | Organise resources and responsibilities in advance to facilitate a smooth installation process without disrupting work. |
Step 1: Assess site requirements and branding
Before you design a single sign, you need to understand what your construction site actually requires. This means looking at three key areas: the physical space, regulatory demands, and your project’s brand identity. Getting this foundation right prevents costly redesigns later and ensures your signage works harder for you.
Start by walking your site and identifying where signage needs to go. Where will visitors enter? Which areas pose safety hazards? Are there pinch points where workers congregate? Your layout determines sign placement, size, and visibility angles. Take photographs and sketch zones on a site plan—this becomes your reference document.
Next, understand the regulatory landscape. Construction sites in the UK must comply with Health and Safety regulations requiring specific safety signs. You’ll need prohibition signs, mandatory instruction signs, warning signs, and safe condition signs. British Standard BS EN ISO 7010 governs these symbols, ensuring they’re universally understood across multilingual teams. This isn’t optional—it’s a legal requirement that protects workers and your project’s liability.
Now consider your branding strategy. Your signage communicates more than safety messages—it tells visitors about your organisation’s professionalism and standards. Ask yourself these questions:
- What colours and logos define your brand?
- Does your signage need to reflect corporate guidelines?
- Will visitors photograph the site for marketing purposes?
- Should signage convey project status or milestones?
Your answers shape everything from material choices to typography. A well-branded site signals competence and builds trust with stakeholders, clients, and neighbours.
Your site assessment should document physical constraints, regulatory requirements, and brand guidelines in one clear brief before design begins.
Consider your workforce too. If your team includes workers from different backgrounds, multilingual signage ensures safety messaging reaches everyone. This isn’t extra complexity—it’s risk management built into your design phase.
Pro tip: Create a simple site assessment checklist covering access points, hazard zones, visibility sightlines, brand guidelines, and regulatory categories required. Photograph everything and attach photos to your checklist—you’ll reference this throughout the design process and avoid guessing about dimensions or sight angles later.
Step 2: Plan sign types and strategic locations
Now that you understand your site’s needs and regulatory requirements, it’s time to map out which signs go where. Strategic placement transforms signage from decoration into a safety and communication system that actually works. Your goal is ensuring every worker and visitor sees the right message at the right moment.
Start by identifying the five core sign categories you’ll need. Prohibition signs (typically red circles with a slash) stop dangerous behaviours. Mandatory instruction signs (blue circles) tell people what they must do. Warning signs (yellow triangles) alert people to hazards. Safe condition signs (green rectangles) show escape routes and first aid locations. Fire safety signs communicate evacuation procedures. You won’t necessarily use all five categories, but your site risk assessment determines which ones are critical.
Here is a comparison of sign types, their colours, and core safety functions:
| Sign Type | Standard Colour | Main Message Function |
|---|---|---|
| Prohibition | Red | Forbid dangerous actions |
| Mandatory Instruction | Blue | State required behaviours |
| Warning | Yellow | Alert to potential hazards |
| Safe Condition | Green | Indicate escape or rescue |
| Fire Safety | Red | Outline fire procedures |
Location is everything. Think about worker flow patterns and decision points. People need to see hazard warnings before they enter dangerous areas, not after. Position signs at entry points where visitors first arrive. Place them near high-risk zones like scaffolding, excavations, and machinery areas. Mark escape routes and welfare facilities clearly. Strategic sign placement requires visibility consideration at natural decision points where workers pause or choose directions.

Colour coding accelerates message recognition. Red demands immediate attention. Yellow warns of hazards. Blue instructs mandatory actions. Green reassures with safe directions. Your team learns these codes quickly, reducing confusion across multilingual workforces.
Consider sight lines carefully. Signs positioned too high or too low get missed. Mount them at eye level where people naturally look. Ensure nothing obstructs them—materials, equipment, or vegetation can render a sign invisible. Test sightlines from the angles workers actually approach from.
Your placement strategy should prioritise hazard zones first, then entry points, then secondary pathways—creating a logical safety hierarchy across the site.
Think about maintenance too. Signs weather, fade, and get damaged. Plan for accessibility so you can replace or repair signs without disrupting work. Position them where cleaning crews can reach them without creating additional hazards.
Pro tip: Walk your site with your risk assessment and mark proposed sign locations with tape or chalk before installation begins. Have your site manager and a few team members walk the route and give feedback—they’ll spot sight-line issues and placement problems you might miss from the office.
Step 3: Design impactful and compliant signage
Your signage must work on two fronts—it needs to grab attention and communicate clearly whilst meeting strict regulatory standards. This balance separates professional, effective signage from ineffective clutter. The design phase determines whether your signs actually protect workers or become background noise.
Start with typography. Choose fonts that are bold and legible from distance. Sans-serif typefaces work better than serif fonts on construction sites because they’re easier to read quickly. Test your font choices at the distances where workers will actually view them. A beautiful font that’s hard to read at 10 metres is worse than useless—it’s a liability.
Colour plays a critical role in compliance and visibility. Use the standard colour scheme for safety signage where red signals prohibition, yellow warns of danger, blue instructs mandatory actions, and green indicates safe conditions. These colours aren’t decorative choices—they’re regulatory requirements. Your colour combinations must also provide sufficient contrast so people with colour blindness can distinguish messages.

Keep messaging short and direct. Three to five words maximum. Workers scanning your sign have seconds to understand it. Avoid clever wordplay or lengthy explanations. “Hard hats required” beats “All personnel must wear appropriate personal protective equipment including hard hats at all times within this designated zone.”
Incorporate symbols or pictograms alongside text. A visual combined with words reaches people across language barriers and those who read slowly. Symbols also speed up comprehension—your brain processes images faster than text.
Consider material durability for your construction environment. Weather, UV exposure, and constant wear will degrade your signs. Choose materials that maintain visibility and structural integrity through mud, rain, and site equipment movement.
This table summarises key considerations for effective construction signage design:
| Consideration | Why It Matters | Impact on Site |
|---|---|---|
| Font Legibility | Improves readability at a distance | Reduces worker errors |
| Colour Contrast | Aids visibility in variable lighting | Helps rapid response |
| Symbol Inclusion | Bridges language barriers | Increases compliance |
| Material Durability | Maintains sign effectiveness | Lowers replacement costs |
Compliant signage isn’t about looking good—it’s about being understood instantly by tired workers moving quickly through your site.
Test your designs in real conditions before full installation. Photograph prototypes at different times of day and from various angles. Ask site workers to read signs from typical viewing distances without prompting. Real-world feedback reveals problems that office assessments miss.
Pro tip: Build compliance checks into your design approval process—before any sign goes into production, verify it meets British Standard BS EN ISO 7010 requirements and your site-specific risk assessment categories. A small design change caught now costs nothing; reprinting hundreds of non-compliant signs costs thousands.
Step 4: Review, approve and prepare for installation
Before your signage goes live on site, it must pass a rigorous review process. This checkpoint prevents expensive mistakes and ensures every sign meets regulatory requirements. Think of it as quality control for safety—cutting corners here creates liability and operational disruptions later.
Start your review by checking compliance against CDM 2015 regulations and HSE guidelines. Before installation, signage must meet legal requirements and visibility standards specified in your site risk assessment. Create a checklist covering British Standard BS EN ISO 7010 compliance, colour accuracy, text legibility at intended viewing distances, and correct positioning against your site plan.
Involve your site team in the approval process. Have your site manager, safety officer, and a few experienced workers review mock-ups or samples. They’ll spot practical issues you might miss from the office. Can they read the text clearly? Is the message unambiguous? Will the sign stay visible once the site gets muddy? Real-world perspective is invaluable.
Verify your materials and printing quality before mass production. Request physical samples of at least three signs. Examine print quality, colour match, material durability, and mounting hardware. Test how materials weather—check UV resistance and water resistance. A sign that fades in four weeks creates compliance problems and looks unprofessional.
Prepare your installation logistics once designs are approved. Determine whether you need site permissions or scheduling approvals. Identify which teams will install signs and when. Plan installation to minimise disruption during active construction work. Early morning or weekend installation often works better than interrupting daytime operations.
Approval isn’t bureaucracy—it’s your safety net. One rejected design now beats installing non-compliant signage that you’ll need to replace later.
Organise your resources methodically. Compile all installation materials, hardware, and tools in one location before installation day. Assign clear responsibilities. Brief your installation team on placement specifications using your site plan and photographs. Poor installation undermines even excellent design.
Schedule your first inspection immediately after installation. Check that signs are positioned exactly as planned, securely mounted, and fully visible from intended viewing angles. Document everything with photographs showing actual sight lines and placement.
Pro tip: Create an approval sign-off document with signatures from your project manager, site safety officer, and HSE representative before ordering production runs. This single document protects you legally and prevents disputes about what was agreed—particularly important on large developments with multiple stakeholders involved.
Elevate Your Construction Site Safety with Expert Signage Solutions
Designing compliant and impactful construction signage takes precision and a deep understanding of safety regulations such as British Standard BS EN ISO 7010 and CDM 2015. Many sites struggle with ensuring signage is visible, durable, and clearly communicates across diverse workforces while reflecting their brand professionalism. Avoid costly redesigns and safety risks by choosing signage solutions crafted to meet your exact site assessment needs and strategic placement requirements.
Pik Pik POW! specialises in creating bespoke indoor and outdoor signage that combines strong design expertise with precision manufacturing. Whether you need robust safety signs that withstand UK weather conditions or bold branding to build stakeholder trust, our team delivers high-quality results tailored to construction environments. Discover our approach in the Shop Signage Archives – Pik Pik Pow and learn about the latest Printing Technology Archives – Pik Pik Pow that ensure your signs remain legible and compliant throughout your project.

Ready to transform your construction signage into a reliable communication system that protects your workforce and enhances your site image? Visit Pik Pik POW! today and start designing signage that works as hard as you do. Get in touch now to secure expert advice and products tailored to your UK construction project.
Frequently Asked Questions
What are the key requirements for designing construction signage for UK sites?
Before designing signage for construction sites in the UK, assess the physical space, regulatory demands, and branding. Walk the site to identify critical areas for sign placement and document the regulatory signage required under UK Health and Safety regulations to align with compliance.
How do I determine the appropriate types of signs for my construction site?
Identify the five core sign categories you need: Prohibition signs, Mandatory instruction signs, Warning signs, Safe condition signs, and Fire safety signs. Conduct a risk assessment to determine which categories are essential for your site based on potential hazards and visitor flow.
How should I strategically place signs at my construction site?
Place signs at key decision points and hazard zones to ensure visibility. Use worker flow patterns to inform placement, ensuring that signs are mounted at eye level and unobstructed by materials or equipment to guarantee they are seen by everyone.
What design elements should I consider for effective construction signage?
Focus on typography, colour contrast, and symbols to create impactful signage. Use bold, legible fonts and adhere to the prescribed colour scheme for safety signs, keeping messaging concise—ideally three to five words—while ensuring symbols support the text for better comprehension across diverse teams.
How can I ensure that my construction signage complies with UK regulations?
Review your signage designs against British Standard BS EN ISO 7010 and other relevant regulations before production. Create a compliance checklist, including text legibility and positioning, to confirm that each sign meets legal requirements and supports your site-specific risk assessment.
What steps should I take to prepare for the installation of construction signs?
Organise your installation logistics by compiling all necessary materials, tools, and responsibilities in advance. Plan to install signs during low-activity periods to avoid disruption and conduct a thorough inspection immediately after installation to ensure signs are accurately placed and visible.