TL;DR:
- Managing an architectural signage project without a defined workflow often leads to rejected drawings, delays, and budget overruns. A structured process from site survey through to final installation ensures regulatory compliance, consistency, and efficient coordination among teams. Incorporating sign families, clear documentation, and early accessibility planning significantly reduces errors and streamlines project completion.
Managing a signage project without a defined architectural signage workflow is one of the most reliable ways to watch a budget unravel. Drawings get rejected. Fabrication starts before permits are approved. Installation teams arrive on site to find mounting surfaces that don’t match the specs. These aren’t rare occurrences; they’re the predictable outcome of skipping structured process. This guide walks you through every stage of a well-built signage workflow, from site survey and compliance planning through to final installation verification, with the technical detail that project managers actually need.
Key takeaways
| Point | Details |
|---|---|
| Start with compliance, not aesthetics | Building regulatory constraints into early design stages reduces permit rejections and costly redesigns. |
| Site survey underpins everything | Accurate site data on traffic flows, substrates, and environment is the foundation of every subsequent decision. |
| Use sign families and hierarchy | Grouping signs into families with a clear numbering system keeps large projects consistent and fabrication straightforward. |
| Integrate accessibility from day one | Accessibility requirements built into the design process prevent expensive last-minute revisions before installation. |
| Documentation quality determines success | Coordinated, standardised drawings across permit, manufacturing, and installation sets eliminate the most common project delays. |
The architectural signage workflow explained
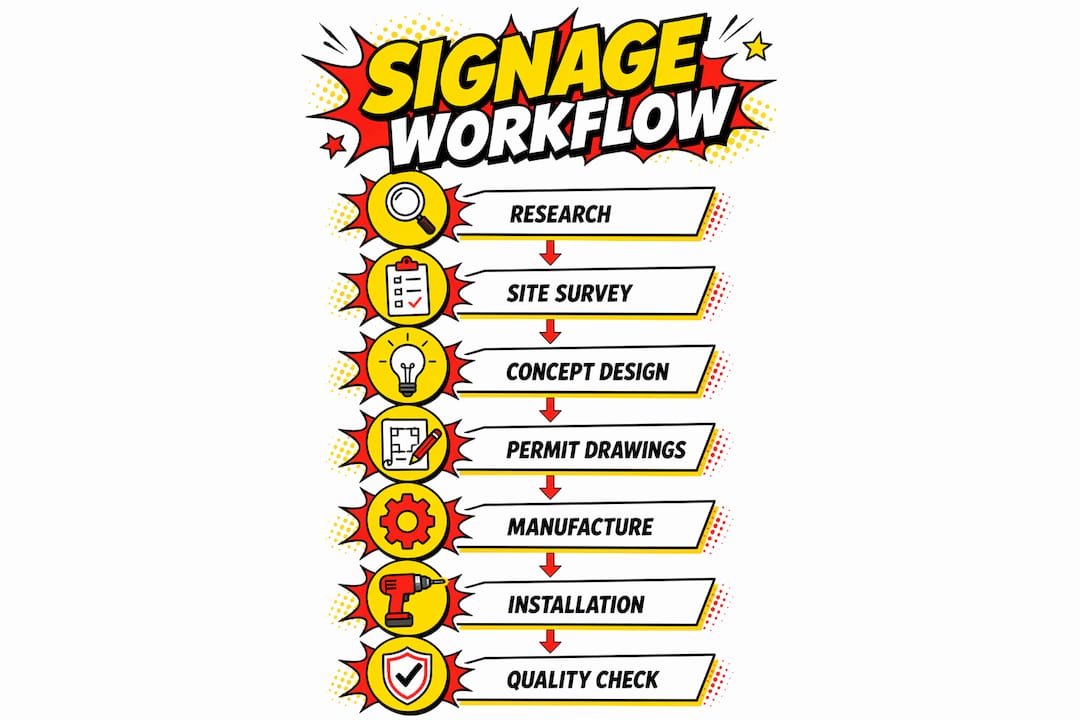
The term “architectural signage workflow” refers to what the industry more formally calls a sign system design process. It is a sequential, documented methodology covering every stage from initial research through to post-installation sign-off. Core workflow stages move from research and site survey through conceptual design, sample testing, finalisation, production drawings, and installation drawings. Understanding that structure upfront is what separates projects that finish on time from those that spiral into revision cycles.

The process isn’t linear in the rigid sense. Decisions at the compliance stage, for example, loop back into design. But each stage produces specific deliverables, and skipping any of them creates a gap that tends to surface at the worst possible moment, usually during fabrication or on installation day.
Prerequisites and planning
Before a single design concept is sketched, three things need to be in place: a clear project scope, reliable site data, and a preliminary understanding of applicable regulations.
Defining scope and objectives
Document what the project must achieve. Is this a wayfinding system for a multi-storey office building? A retail environment with brand-driven exterior fascia signs? A healthcare facility with mandatory tactile elements? The scope determines sign types, quantities, materials, and the regulatory frameworks that apply. Stakeholder sign-off on scope at this stage prevents the most common source of project creep.
Conducting a site survey
A thorough site survey including traffic flows, existing signage, and installation constraints is critical for successful sign system design. You need to document ceiling heights, wall substrates, lighting conditions, pedestrian and vehicle movement patterns, and any structural features that affect mounting options. Photographs, measurements, and notes should all feed into a formal survey report.
Compliance and accessibility research
Before finalising the brief, research the regulatory requirements relevant to the project location and building type. In the UK, this includes the Equality Act 2010 and relevant British Standards for accessible signage. For international projects or UK-based work for global clients, you may also need to consider ADA accessibility requirements. Understanding these constraints at the outset shapes every design decision that follows.
The table below summarises the key prerequisites and what each one feeds into later in the workflow.
| Prerequisite | Purpose in the workflow |
|---|---|
| Project scope document | Defines sign types, quantities, and regulatory frameworks |
| Site survey report | Informs mounting, substrate, and environmental material choices |
| Compliance research | Sets non-negotiable design parameters before concept work begins |
| Stakeholder brief | Aligns expectations and reduces revision cycles |
| Tools and software selection | CAD platform, project management, and documentation standards agreed upfront |
The design and technical documentation process
This is where the signage design process moves from research into production-ready documentation. It involves four distinct drawing types, each serving a specific purpose.
Conceptual design
Conceptual drawings present visual direction. They establish colour palette, typography, material choices, and the overall aesthetic language of the sign system. These drawings are for client approval and should reflect both brand identity and the compliance constraints established in the planning stage.
CAD permit drawings
Permit drawings are produced to satisfy planning and building authority requirements. They must include precise dimensions, material specifications, fixing details, and any structural load information required by the local authority. Starting signage design with compliance constraints reduces rework and cuts permit approval timelines significantly. Design teams that approach permit drawings as a separate, compliance-led exercise rather than a by-product of concept work get approvals faster.
Pro Tip: Lock compliance and permit requirements before beginning detailed concept development. Every hour spent redesigning for regulatory compliance after concept approval is avoidable.
Manufacturing drawings
Manufacturing drawings translate the approved concept into fabrication-ready specifications. They include detailed dimensions, substrate materials, finish specifications, cut paths for routing or laser cutting, and electrical requirements for illuminated signs. Manufacturing and installation drawings must derive from the same coordinated detail drawings to act as a single source of truth, ensuring what is produced matches what was approved.
Installation drawings
Installation drawings tell the installation team exactly how and where each sign goes. They reference specific sign numbers, show fixing positions, substrate types, and clearances. These are produced last but must be coordinated with both the fabrication drawings and the site survey data gathered at the start.
| Drawing type | Purpose | Key elements |
|---|---|---|
| Conceptual | Client approval and visual direction | Colour, typography, materials, layout |
| Permit | Regulatory submission | Dimensions, structural details, compliance notes |
| Manufacturing | Fabrication instructions | Cut specs, finishes, electrical requirements |
| Installation | On-site guidance | Fixing positions, sign numbers, substrate details |
Sign families, hierarchy, and system documentation
One of the most underused tools in sign project management is the sign family framework. Workflow success depends more on systemisation and documentation quality than on isolated design talent. This is especially true on large or multi-building projects.
What are sign families?
Sign families are groups of signs that share the same format, material, and function. For example, a hospital project might have a primary wayfinding family, a room identification family, a regulatory compliance family, and an exterior identification family. Grouping signs this way means decisions made for one sign in a family automatically apply to all others in that group, dramatically reducing both design time and the potential for inconsistency.
Numbering and hierarchy systems
Every sign in the project should carry a unique reference number that ties it to the sign schedule, the drawings, and the installation plan. A clear numbering convention, such as using prefix codes to indicate family type and location zone, allows any team member or subcontractor to locate information quickly. Sign family grouping and visual hierarchy supports scalability in projects covering multiple buildings or campuses, reducing administrative overhead substantially.
The benefits of a well-structured sign system include:
- Consistent visual identity across large projects and multiple vendors
- Simplified coordination between design, fabrication, and installation teams
- Faster response to design changes, since updates to a family template cascade across all members
- Cleaner permit submissions, because documentation is organised and cross-referenced
- Reduced errors during installation, since every sign has a precise reference and a corresponding installation drawing
Accessibility and compliance integration
Accessibility is not a final check. It is a design parameter. Integrating accessibility early in design prevents costly last-minute adjustments and maintains navigability for all users throughout the building. This applies whether you are working to UK standards, international guidelines, or both.
Core accessibility requirements
For UK projects, the Equality Act 2010 requires that signage does not create barriers for disabled users. In practical terms, this means considering:
- Typeface selection. Sans-serif fonts with consistent stroke width are significantly easier to read for people with visual impairments. Avoid decorative letterforms in wayfinding contexts.
- Colour contrast. A minimum 70% contrast ratio between text and background is the accepted benchmark for legible signage.
- Tactile elements. Braille and raised lettering are required for certain sign types in healthcare, public buildings, and commercial spaces.
- Mounting heights. Centreline mounting heights for tactile signs are standardised to allow wheelchair users and ambulant disabled people equal access to information.
You can explore wayfinding-specific accessibility planning in more detail through Pikpikpow’s wayfinding sign guidance, which covers these requirements in a UK commercial context.
Pro Tip: Engage an accessibility consultant during the conceptual design stage, not after permit submission. Their input at concept level costs a fraction of what a post-approval redesign costs.
Digital tools and CAD enable precision and consistency in accessibility compliance, and they make it straightforward to update specifications if regulatory requirements change during a long project.
Quality assurance and final verification
The final phase of the workflow is where problems accumulated earlier tend to surface. A structured quality assurance process keeps this manageable.
Common bottlenecks and how to address them
- Permit drawing rejections. The most frequent cause is missing information rather than incorrect design. Before any submission, run a checklist against the local authority’s requirements. Persistent follow-up and a designated contact improve permit application progress and reduce delays measurably.
- Documentation gaps between drawing sets. If the manufacturing drawings and installation drawings are produced by different teams, cross-reference them before fabrication begins. Misaligned fixing positions are among the most expensive errors to correct on site.
- Stakeholder communication lapses. Assign a single point of contact for each external party: the planning authority, the fabricator, and the installation contractor. Clear communication lines reduce the risk of decisions being made in isolation.
- Site conditions differing from survey data. Always conduct a pre-installation site check with the installation team present. Compare actual conditions against the drawings and resolve discrepancies before any sign is fixed.
- Final sign-off documentation. Photograph every installed sign against its reference drawing and compile a completion report. This protects all parties and provides a record for future maintenance or extension of the system.
Key verification steps before project close:
- All signs installed match approved permit drawings
- Accessibility compliance verified by a qualified reviewer
- Sign schedule updated to reflect any on-site variations
- As-built drawings produced and issued to the client
- Maintenance guidance provided for illuminated or digital elements
My perspective on workflow efficiency
In my experience, the projects that run into trouble almost never fail because of a design problem. They fail because the workflow was built around the design, rather than the design being built within the workflow.
I’ve seen teams produce genuinely impressive concept work, only to face weeks of delay because the permit drawings were effectively redesigned from scratch to meet regulatory requirements that should have been factored in from the start. Reversing the traditional aesthetic-first approach by incorporating regulatory constraints from the outset is one of the most practical improvements a project manager can make to their process.
What I’ve also learned is that effective signage programmes treat the system as a strategic asset, not just a visual layer applied at the end of a construction project. The moment signage planning is integrated with the broader project programme rather than bolted on at the end, delivery timelines tighten and quality improves.
The sign family and documentation framework isn’t bureaucracy for its own sake. On a project covering multiple buildings or phases, it is the only way to maintain consistency without micromanaging every fabrication decision. For project managers, the investment in building that framework early pays back in reduced queries, fewer errors, and faster installation.
— PikPikPOW!
How Pikpikpow can support your signage project
If you are managing a complex architectural signage project and need a supply partner who understands the full workflow, Pikpikpow works with design teams, project managers, and main contractors across the UK to deliver bespoke sign systems from concept through to installed completion. Our signage systems service covers sign schedule production, technical documentation, fabrication, and installation coordination, giving you a single point of contact across the entire process.
We also offer internal and wayfinding signage solutions built to UK accessibility standards, suitable for healthcare, commercial, and public sector projects. Whether you are starting from a blank brief or inheriting a partially completed sign system, our team can step in at any stage. Get in touch with Pikpikpow to discuss your project requirements and find out how we can support your workflow from the ground up.
FAQ
What are the main stages of an architectural signage workflow?
The core stages follow a sequential process: research, site survey, conceptual design, sample testing, finalisation, manufacturing drawings, and installation drawings. Each stage produces specific deliverables that feed into the next.
Why do permit drawings get rejected so often?
Most rejections result from missing information rather than design errors. Producing permit drawings as a compliance-led exercise from the start, with all required dimensions, structural details, and material specifications included, reduces rejection rates significantly.
When should accessibility requirements be addressed in the signage process?
Accessibility requirements should be built into the conceptual design stage, not reviewed at the end. Addressing font choices, contrast ratios, tactile elements, and mounting heights early avoids costly revisions after permit approval.
What is a sign family and why does it matter for project managers?
A sign family is a group of signs sharing the same format, function, and material. Organising signs into families with a consistent numbering system allows updates and changes to cascade across an entire group, saving time and reducing inconsistency on large projects.
How do manufacturing and installation drawings differ?
Manufacturing drawings provide fabrication-ready specifications including materials, finishes, and cut paths. Installation drawings tell the installation team where and how each sign is fixed on site. Both must be coordinated from the same approved drawing set to avoid misalignment between what is made and what is installed.