

TL;DR:
- Proper planning of budgeting, permitting, and design ensures signage success and prevents costly delays.
- Consistent brand identity and accessibility compliance are vital for effective, recognizable signage that meets legal standards.
Getting your branding signage setup wrong is an expensive mistake. Businesses that skip early planning routinely face permit rejections, fabrication delays, or signage that simply fails to perform. A proper step by step branding signage setup covers far more than choosing a font and picking a colour. It spans budgeting, compliance, design, permitting, installation, and ongoing evaluation. This guide walks you through each stage in sequence, so you can move from concept to completed signage without the costly surprises that trip up so many businesses.
Table of Contents
- Key takeaways
- Step by step branding signage setup: planning first
- Designing your branding signage
- Securing permits and approvals
- Installing your signage correctly
- Maintaining and evaluating your signage
- What I have learned from years of signage projects
- How Pikpikpow can support your signage setup
- FAQ
Key takeaways
| Point | Details |
|---|---|
| Start with a realistic budget | Business signage costs vary widely; setting your budget early determines materials, size, and complexity. |
| Design for brand consistency | Colour, font, and messaging must align with your existing brand identity across every sign. |
| Secure permits before fabrication | Submitting permit drawings early prevents costly rework and delays once artwork is finalised. |
| Follow accessibility requirements | ADA and UK accessibility standards affect placement, height, and tactile signage specifications. |
| Maintain signage after installation | Regular upkeep protects your brand reputation and extends the lifespan of your investment. |
Step by step branding signage setup: planning first
Before a single design decision is made, you need a solid planning foundation. Skipping budgeting and permitting checks is the fastest way to waste signage spend, and it happens more often than you might expect.
Setting your budget
Business signage typically costs between $2,000 and $3,000 on average, though UK projects vary considerably depending on material, scale, and installation complexity. Set your budget before approaching any designer or supplier. Your budget directly determines what materials are viable, how large your signage can be, and whether illuminated options are realistic.
Key cost factors to account for at the planning stage:
- Materials: Aluminium, acrylic, and dibond each carry different price points and suit different environments. You can explore your options through a signage materials guide to make an informed choice.
- Size and complexity: Larger formats and multi-panel systems cost more to produce and install.
- Installation: Professional fitting, scaffolding, and electrical connections add to the total.
- Permits: Fees, drawings, and application costs should be budgeted separately from fabrication.
Defining your signage goals
Think about who your signage needs to speak to and what it needs to achieve. A retail fascia sign has a very different job from an office reception sign or a construction site hoarding. Knowing your goal shapes every decision that follows, from material selection to copy length.
| Signage type | Primary goal | Typical environment |
|---|---|---|
| Fascia sign | Brand visibility from street level | Retail, hospitality |
| Wayfinding sign | Direct customers or visitors | Commercial, healthcare |
| Illuminated sign | Visibility in low light | Retail, entertainment |
| Reception sign | Brand impression on arrival | Corporate, professional |
Pro Tip: Write a one-sentence brief for each sign you need before briefing a designer. “This sign must be readable from 10 metres away by first-time visitors” is far more useful than a vague description.
Checking permit and compliance requirements
Research local planning and permit requirements before finalising any designs. Many local authorities require applications before installation, and fees and documentation vary by location. Getting this wrong can halt your project entirely. In the UK, many external signs fall under the Advertisement Consent process within the planning system.
Designing your branding signage
Good signage design is not just about aesthetics. It is about making your brand instantly recognisable and your message easy to read under real-world conditions.
Keeping brand identity consistent
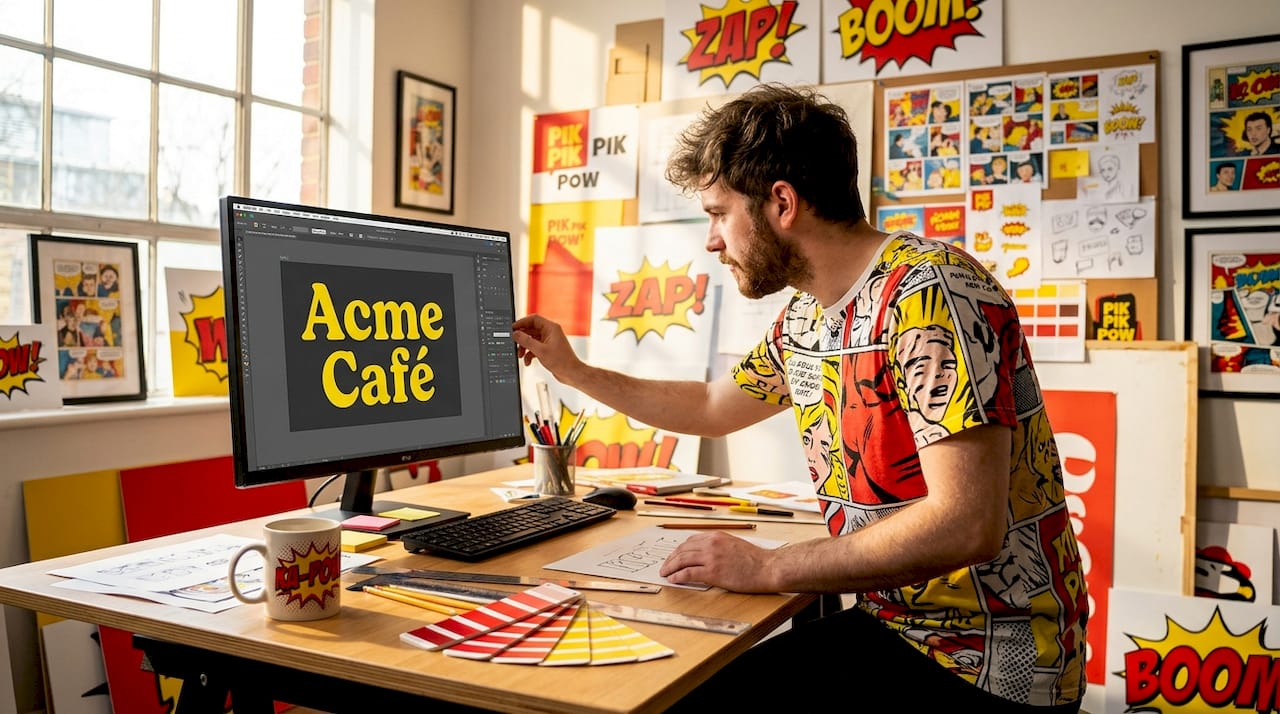
Consistency in colour, font, and messaging is the foundation of effective signage. Your signs should match your logo, your website, and your other marketing materials precisely. This means using exact brand colour values (Pantone or RAL references for physical production), not approximations. One sign printed slightly off-brand undermines the visual coherence you have worked to build.
Core branding signage tips for design consistency:
- Use your brand typeface, or a close physical equivalent approved by your designer.
- Limit your sign to one or two messages. Cluttered signs lose readers.
- Reproduce your logo from master artwork, never from a low-resolution screenshot.
- Specify exact colour references for every print or fabrication job.
Ensuring legibility
Font size, contrast, and placement all affect how readable your signage is from the distances your audience will encounter it. A general rule: characters should be approximately 25mm tall for every metre of viewing distance. Dark text on a light background consistently outperforms light text on a dark background in outdoor conditions.
Avoid decorative fonts for body copy on signage. They may look appealing on screen but frequently fail in fabricated form, particularly at smaller sizes or when viewed at an angle.
Accessibility in your signage design
Businesses subject to accessibility obligations must design signage accordingly. ADA requirements state that tactile characters and Braille must be positioned between 48 and 60 inches from the floor baseline. While ADA is a US standard, UK businesses should refer to the Equality Act 2010 and consider tactile and Braille elements for permanent room identification signs in public-facing premises.
Wayfinding signage also plays an accessibility role beyond marketing, supporting equal access obligations. Signs must direct visitors to accessible entrances when not all entrances meet accessibility standards. You can find practical guidance on how to create effective wayfinding signs that satisfy both brand and compliance requirements.
Pro Tip: Commission an ADA or accessibility audit of your existing signage before a new installation project. Identifying which signs require tactile or Braille additions early prevents costly rework later.
Proofing before fabrication
Always review a physical or digital mock-up before approving artwork for production. Check spelling, brand colours, alignment, and proportions at the intended scale. Errors found at this stage cost nothing to correct. Errors found after fabrication can cost you the entire production budget.
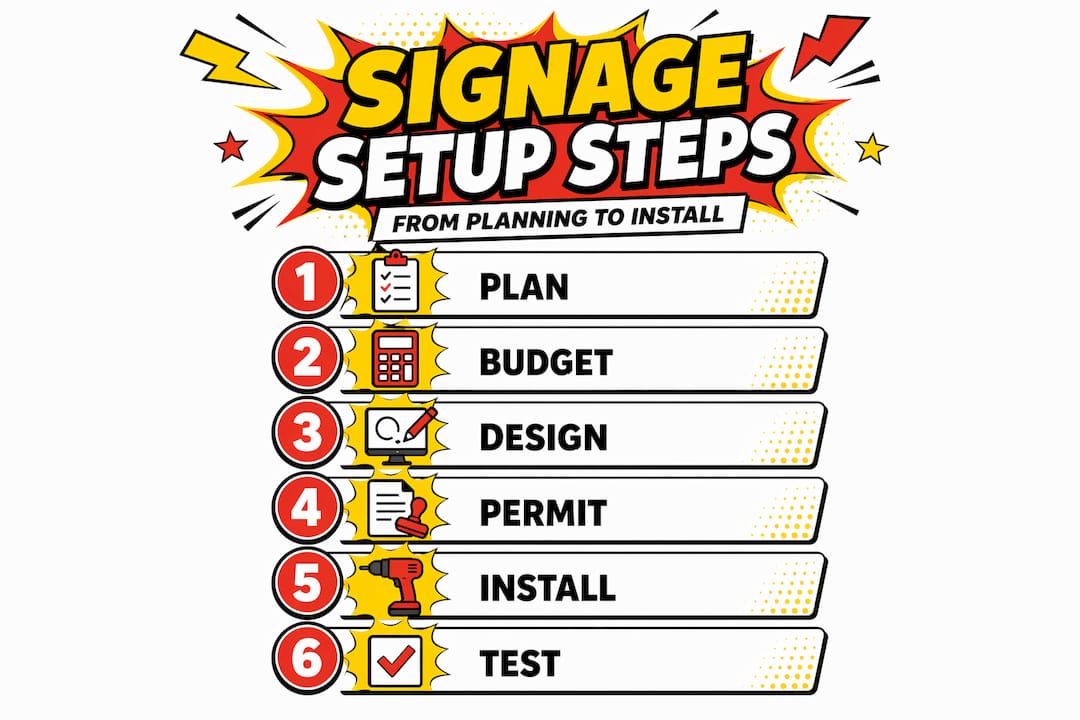
Securing permits and approvals
Many business owners treat permitting as an afterthought. It should be one of the first steps in your branding signage guide.
- Research requirements early. Contact your local planning authority or building control team before finalising designs. Find out whether your signage requires Advertisement Consent, a Building Warrant, or a standard sign permit.
- Prepare permit drawings. Permit applications typically require scaled drawings showing size, height, copy, attachment method, and illumination details. Preparing these before finalising your artwork means you can adjust based on authority feedback without scrapping fabrication-ready files.
- Allow adequate time. Permit processes can take weeks or months depending on your local authority. Build this into your project timeline from the outset.
- Clarify landlord restrictions. If you lease your premises, your landlord may have restrictions on signage size, fixing methods, or illumination. Confirm these in writing before spending on design.
Getting permit drawings done before locking your final artwork is one of the most practical steps in signage planning. It costs nothing to revise a drawing. It costs a great deal to revise a fabricated sign.
Installing your signage correctly
Physical installation is where planning either pays off or falls apart. The branded signage project workflow from concept through to installation involves multiple coordination points, and the installation phase is where professional expertise matters most.
Mounting, positioning, and placement
- Position external signage at a height and angle that maximises visibility from the primary pedestrian or vehicle approach.
- For internal signs, consider sightlines from entrances, lifts, and stairwells.
- Use appropriate fixings for the substrate. Masonry, timber, and lightweight cladding each require different anchor systems.
- Tactile room identification signs should be mounted on the latch side of the door, with tactile components at 48 to 60 inches from the floor.
Digital signage setup
Digital signage setup involves a structured sequence: hardware planning, software installation, content scheduling, and testing. For each screen or display unit, confirm power supply requirements, network connectivity, and mounting points before delivery. Configure your content management system before the screens arrive on site where possible. This avoids delays caused by on-site software setup with crews waiting.
Pro Tip: For outdoor digital signage, check the screen’s brightness rating (measured in nits) against the ambient light conditions at your installation location. A screen that looks sharp indoors can become unreadable in direct sunlight if underpowered.
Testing after installation
Test illumination, software, and content display after every installation before signing off. Walk the approach routes your customers take and assess visibility from 5 metres, 10 metres, and 20 metres. For illuminated signs, check for uneven lighting, dead bulbs, or transformer noise. For digital displays, confirm content is playing on the correct schedule and that remote management tools are functioning.
Maintaining and evaluating your signage
Installation is not the end of the process. Signage is a long-term brand asset, and it requires ongoing attention to deliver consistent returns.
- Set a maintenance schedule. Inspect all external signage at least twice a year. Look for fading, physical damage, loose fixings, and failed illumination components.
- Act on damage promptly. Damaged signs harm brand reputation directly. A cracked fascia or a dead neon section tells customers more about your business than you intend.
- Track performance indicators. Monitor foot traffic, enquiry volumes, or customer feedback in the weeks following a new installation to gauge impact. Attributing change to signage is not always exact, but patterns emerge over time.
- Use digital elements to measure engagement. If your signage includes a QR code or a specific URL, track scan rates and traffic to understand how customers are interacting with it.
- Plan for upgrades. Most exterior signage has a practical lifespan of 5 to 10 years depending on material and exposure. Build replacement planning into your long-term marketing budget rather than reacting when signs fail.
What I have learned from years of signage projects
Working across retail, commercial interiors, and construction, I have seen the same planning mistakes repeat themselves. The businesses that struggle most are those that treat signage as a final-stage purchase rather than a project in its own right.
Rushing into design without a confirmed budget leads to scope changes mid-project, which inflate costs and erode relationships with suppliers. Leaving permits to the last minute causes installation delays that ripple through shop opening schedules, lease timelines, and marketing launches. These are not rare edge cases. They are the norm for businesses that skip the steps outlined in this guide.
What actually works is treating the planning and compliance stages as non-negotiable. The design is the enjoyable part, but it only lands well when the groundwork is solid. Creativity within a well-defined brief almost always produces stronger signage than unconstrained design that later fails a permit check.
I would also encourage business owners to think of their signage as an evolving asset rather than a one-time project. Brands change. Premises change. Markets change. The businesses with the strongest visual presence are the ones that review and refresh their signage with the same regularity they apply to their websites and marketing materials.
— PikPikPOW!
How Pikpikpow can support your signage setup
At Pikpikpow, we work with businesses across retail, commercial interiors, construction, and the TV and film industry to deliver signage that performs from day one. Whether you need a single shopfront fascia or a complete signage systems installation across multiple locations, our team handles design, fabrication, permitting support, and installation as a joined-up process.
We specialise in bespoke indoor and outdoor solutions, including digital signage with full hardware and software integration, architectural signage, wide-format print, and vehicle graphics. Our design team works to your brand guidelines precisely, and our manufacturing process is built for accuracy and durability.
If you want to take the next step without the guesswork, speak to the Pikpikpow team. We can advise on budget, materials, compliance, and timelines from the outset, giving you a clear picture before you commit to anything. Explore our signage solutions or get in touch to discuss your project directly.
FAQ
What does a step by step branding signage setup involve?
A full signage setup covers budgeting, goal setting, design, permit applications, physical installation, and post-installation maintenance. Completing each stage in order prevents costly mistakes and delays.
How much does business signage typically cost?
Business signage typically costs between $2,000 and $3,000 on average, though UK projects vary based on materials, size, illumination, and installation complexity.
Do I need a permit for business signage in the UK?
Most external business signs in the UK require Advertisement Consent under the planning system, though deemed consent applies to some standard signs. Always check with your local planning authority before installation.
What are the key accessibility requirements for signage?
For businesses with public-facing premises, tactile and Braille elements are required on permanent room identification signs. Tactile characters must sit between 48 and 60 inches from the floor baseline under ADA standards, with equivalent principles applicable under UK accessibility guidance.
How often should signage be maintained?
External signage should be inspected at least twice a year for fading, damage, and failing fixings. Timely repairs sustain brand impact and prevent minor issues from becoming full replacements.